TryOmar's blog

By TryOmar, 13 months ago, In English

Ordered Sets in C++

In C++, ordered sets can be created using special code templates.

#include <ext/pb_ds/assoc_container.hpp>
#include <ext/pb_ds/tree_policy.hpp>
using namespace __gnu_pbds;

template<class T> using ordered_set = tree<T, null_type, less<T>, rb_tree_tag, tree_order_statistics_node_update>;


template<class T> using ordered_multiset = tree<T, null_type, less_equal<T>, rb_tree_tag, tree_order_statistics_node_update>;

Two primary structures are introduced:

  • ordered_set maintains sorted unique elements in ascending order using less comparison.

  • ordered_multiset allows duplicates using a less_equal comparison, preserving the sorted order.

Fucntions

In addition to normal set operations, the ordered set supports:

  • order_of_key(k): Gives the count of elements smaller than k. — O(log n)
  • find_by_order(k): Returns the iterator for the kth element (use k = 0 for the first element). — O(log n)

Deletion in Multiset

To remove an element in a multiset, you must delete it using iterators:

ss.erase(ss.find_by_order(ss.order_of_key(x)));

Simple Usecase

#include <iostream>
#include <ext/pb_ds/assoc_container.hpp>
#include <ext/pb_ds/tree_policy.hpp>
using namespace std;
using namespace __gnu_pbds;

template<class T> using ordered_multiset = tree<T, null_type, less_equal<T>, rb_tree_tag, tree_order_statistics_node_update>;

int main() {
    // Declaration of ordered_multiset as 'ss'
    ordered_multiset<int> ss;

    // Inserting elements into 'ss'
    ss.insert(5);
    ss.insert(2);
    ss.insert(7);
    ss.insert(2); // Allows duplicates
    ss.insert(1);


    // Displaying elements 
    cout << "Elements in the ordered_multiset: ";
    for (auto it : ss) { // 1 2 2 5 7
        cout << it << " ";
    }
    cout << endl;

    // Counting elements less than 5 using order_of_key
    cout << "Elements less than 5: " << ss.order_of_key(5) << endl; // 3

    // Deleting an element, e.g., deleting value 2
    auto it = ss.find_by_order(ss.order_of_key(2)); // Find iterator to the element 2
    if (it != ss.end()) {
        ss.erase(it); // Erase the found element O(log n)
        cout << "Element 2 removed from the ordered_multiset." << endl;
    } else {
        cout << "Element not found in the ordered_multiset." << endl;
    }

    return 0;
}

Sorting Descending (or Equal)

This modification greater allows sorting elements in descending order for set or multiset.

template<class T> using ordered_set = tree<T, null_type, greater<T>, rb_tree_tag, tree_order_statistics_node_update>;

template<class T> using ordered_multiset = tree<T, null_type, greater_equal<T>, rb_tree_tag, tree_order_statistics_node_update>;

Operator Overload

The custom comparison operator is used for handling duplicates within an ordered multiset. It ensures that duplicate elements are retained while maintaining the desired sorting order based on the specified comparison logic.

template<class T>
struct custom_compare {
    bool operator()(const T& a, const T& b) const {
        if (a == b) return true; // Keep duplicates
        return a > b;
    }
};

template<class T> using ordered_multiset = tree<T, null_type, custom_compare<T>, rb_tree_tag, tree_order_statistics_node_update>;

You can modify the operator to sort based on anything you want, for example, based on the frequency of each element you would return fr[a] < fr[b];.

Also, you can check my article on sorting in normal sets/multisets here: Custom Sorting in Normal Sets/Multisets

Full text and comments »

  • Vote: I like it
  • +5
  • Vote: I do not like it

By TryOmar, history, 15 months ago, In English

In my quest to count the bits in an integer's binary representation using recursion, I encountered a unexpected outcome due to operator precedence:

Working Code:

int f(int n) {
    return (n ? (n & 1) + f(n >> 1) : 0);
}

Not Working Code:

int f(int n) {
    return (n ? n & 1 + f(n >> 1) : 0);
}

The big difference? Operator rules. In the first code, it works because we use parentheses to make sure the "AND" operation happens first.

In the second code, missing parentheses cause the compiler to interpret it as n & (1 + f(n >> 1)), resulting in an incorrect bit count.

To avoid confusion and errors, always use parentheses to clarify your intended order of operations in programming.

Additionally, it's important to note that in C++ and many other programming languages, the plus (+) and minus (-) operators have higher precedence than the bitwise AND (&) and OR (|) operators. To understand the complete operator precedence hierarchy, you can refer to resources such as cppreference.com's operator precedence page.

Full text and comments »

  • Vote: I like it
  • -22
  • Vote: I do not like it

By TryOmar, history, 16 months ago, In English

Creating Your Own Codeforces Group

Do you want to start your own group on Codeforces? Whether you plan to organize coding contests, collaborate with friends, or practice together, it's simple. Follow these steps, with images for reference:

Step 1: Visit Codeforces Groups

Go to Codeforces homepage and click "Groups."

Step 2: Create Your Group

On the Groups page, click Create Group.

Step 3: Name and Configure

Pick a name and set group preferences. Then, click "Create."

Congratulations! Your group is ready. Now, let's add contests.


Adding Contests

Step 4: Access the Gym

Visit "GYM" on the Codeforces homepage.

Step 5: Create a Contest

Scroll down in the Gym and choose Create Mashup Contest.

Step 6: Set Up the Contest

Name it, select duration, and add problems by their codes. Click "Create Mashup Contest."

Step 7: Copy Contest ID

Copy the contest ID from the contest details.

Step 8: Add Contest to Group

Go back to your group, click "Add Contest to Group," paste the contest ID, and click "Add."

Your group now has its own contest. Enjoy practicing and collaborating with your group members.

Quick Access to Your Groups

To revisit your groups:

  1. Go to your profile.

  2. Click groups for all your groups.

  3. Or, click "ProblemSetting" for your contests.

Now you know how to create and manage a Codeforces group easily. Start building your coding community and improving your skills with your group!

Full text and comments »

  • Vote: I like it
  • -4
  • Vote: I do not like it

By TryOmar, history, 16 months ago, In English

Let's say you have a set of integers called nums, and you want to sort them based on certain criteria, such as frequency and value. Here's a brief code snippet demonstrating how you can achieve this:

const int N = 1e5 + 1;
int fr[N] = {};

// Define a custom sorting criterion
struct sortCri {
    bool operator()(int a, int b) const {
        // Customize the sorting order here
        if (fr[a] == fr[b]) return a > b;  // Sort values in descending order
        else return fr[a] < fr[b];         // Sort frequencies in ascending order
    }
};

// Create a set using the custom sorting criterion
set<int, sortCri> nums;

In the code above, we have a set called nums that will sort elements based on the criteria defined in the sortCri struct. In this example, we sort in ascending order of frequency (fr[a]) and in descending order of values (a).

You can easily adapt this code to your specific sorting requirements by modifying the conditions inside the operator() function within the sortCri struct.

Full text and comments »

  • Vote: I like it
  • +16
  • Vote: I do not like it

By TryOmar, history, 17 months ago, In English

Rotation — Different Methods for Shifting Elements

Hey folks! Today, I'm writing a simple post to share some snippets about shifting vectors. I'm sharing this because I was working on a problem you can check it out here:1579B - Shifting Sort and I came up with some ideas (you might know them already) to shift elements left and right. But I've gathered them in one place, so it can be like a handy guide for me or anyone else dealing with similar problems.

Let's dive into it!

When you need to shift a list a certain number of times, let's say k times, here's a simple way to make it easier:

First, calculate k % n, where n is the length of the vector. This gives you a smaller value that's still meaningful and will help simplify the process.

Now, depending on whether you're shifting to the left or to the right, there are two scenarios:

Shift Left: To shift elements to the left, follow these steps:

  1. Move the element at index k + 1 to the beginning.
  2. Shift the rest of the elements to their new positions.
  3. Fill the space at the end with the first k elements.

(k = 2): - Original array: {1, 2, 3, 4, 5} - After left shift: {3, 4, 5, 1, 2}


So, let's take a look at how we can do this with some code examples using C++:

Shift Left

    vector<int> arr = {1, 2, 3, 4, 5};
    int n = arr.size(), k = 2,

    // Ensure k is less than n
    k %= n;

    vector<int> temp(n);

    // Shift left
    int j = 0;
    for (int i = k; i < n; ++i, ++j) {
        temp[j] = arr[i];
    }

    for (int i = 0; i < k; ++i, ++j) {
        temp[j] = arr[i];
    }

    // Display the shifted array
    for (int i : temp) {
        cout << i << ' '; // 3 4 5 1 2 
    }

Shift Right: Shifting elements to the right is a lot like left-shifting, but instead of using k, you would use n — k. Here's what you do:

  1. Move the element at index n — k to the front.
  2. Adjust the positions of the other elements accordingly.
  3. Fill the gap at the end with the first n — k elements.

(k = 2): - Original array: {1, 2, 3, 4, 5} - After right shift: {4, 5, 1, 2, 3}

Shift Right

    vector<int> arr = {1, 2, 3, 4, 5};
    int n = arr.size(), k = 2;

    // Ensure k is less than n
    k %= n;

    vector<int> temp(n);

    // Shift right
    int j = 0;
    for (int i = n - k; i < n; ++i, ++j) {
        temp[j] = arr[i];
    }

    for (int i = 0; i < n - k; ++i, ++j) {
        temp[j] = arr[i];
    }

    // Display the shifted array
    for (int i : temp) {
        cout << i << ' '; // 4 5 1 2 3
    }

Shift Using Modulus

These implementations work, but I thought, "Can we make them even simpler?" That's when I discovered the magic of the remainder operation in making things easier.

Shift Left (Using Modulus)

    // Shift left with modulus
    for (int i = 0; i < n; ++i) {
        int newIndex = (i + k) % n;
        temp[newIndex] = arr[i];
    }

Shift Right (Using Modulus)

    // Shift right with modulus
    for (int i = 0; i < n; ++i) {
        int newIndex = (i - k + n) % n;
        temp[newIndex] = arr[i];
    }

Then, I thought about exploring if there's a built-in function that can shift the vector for you using the rotate function.

This function is available in the <algorithm.h> header file.

Using std::rotate for Shifting

rotate(start, middle, end);

Parameters

The rotate() function accepts the following parameters:

  • start: The beginning of the range you want to rotate.

  • middle: The element at which you want to start the rotation, making it the new beginning.

  • end: The end of the range where you want the rotation to stop.

Shift left using std::rotate

    // Shift left using std::rotate
    rotate(arr.begin(), arr.begin() + k, arr.end());

Shift right using std::rotate

    // Shift right using std::rotate
    rotate(arr.begin(), arr.begin() + (n - k), arr.end());

Shift Right AGAIN

You can also shift elements right using std::rotate, use a reverse starting and ending point approach, similar to left shifting, but with rbegin() and rend():

    // Shift right using std::rotate
    rotate(arr.rbegin(), arr.rbegin() + k, arr.rend());

To sum it up, I prefer starting with manual solutions before diving into built-in functions. It makes coding smoother and more enjoyable for me. You can also solve the problem and then check how I approached the problem 218265509.

If you like these post, your positive comments motivate me to create more content like this in the future.

Full text and comments »

  • Vote: I like it
  • +7
  • Vote: I do not like it

By TryOmar, history, 18 months ago, In English

Recently, I was explaining fundamental algorithms like Bubble Sort, Binary Search, Lower Bound, Frequency, and Prefix Sum to my friends. It occurred to me that sharing these algorithms on Codeforces could be beneficial to others as well. So, I decided to share the code, as it might serve as a useful resource for anyone interested in learning these concepts.

Bubble Sort: compares adjacent elements and swaps them if in the wrong order until the list is sorted.

#include <iostream>
using namespace std;

int main() {
    int arr[] = {64, 34, 25, 12, 22, 11, 90};
    int n = sizeof(arr) / sizeof(arr[0]);

    // Bubble Sort
    for (int i = 0; i < n; i++) { // --> O(N^2)
        for (int j = 0; j < n - 1; j++) {
            if (arr[j] > arr[j + 1]) {
                swap(arr[j], arr[j + 1]);
            }
        }
    }

    cout << "Sorted array using Bubble Sort: ";
    for (int i = 0; i < n; i++) {
        cout << arr[i] << " ";
    }

    return 0;
}

------------------------------------------------------------------


Sort with Built-in Function: Sorting the array using the built-in std::sort function from the <algorithm> library. It automatically rearranges the elements in ascending order.


#include <iostream> #include <algorithm> using namespace std; int main() { int arr[] = {64, 34, 25, 12, 22, 11, 90}; int n = sizeof(arr) / sizeof(arr[0]); // Sort using built-in function sort(arr, arr + n); cout << "Sorted array using Built-in Function: "; for (int i = 0; i < n; i++) { cout << arr[i] << " "; } return 0; }

------------------------------------------------------------------


Linear Search: Searching for a target element in the array by iterating through each element one by one (linearly) until the element is found or the end of the array is reached.


#include <iostream> using namespace std; int main() { int arr[] = {64, 34, 25, 12, 22, 11, 90}; int n = sizeof(arr) / sizeof(arr[0]); int target = 90; // Linear Search int index = -1; for (int i = 0; i < n; i++) { // O(N) if (arr[i] == target) { index = i; break; } } if (index != -1) { cout << "Element " << target << " found at index " << index; } else { cout << "Element not found."; } return 0; }

------------------------------------------------------------------


Binary Search: Efficiently finds a target element in a sorted array by dividing the search space in half at each step.


#include <iostream> using namespace std; int main() { int arr[] = {200, 50, 11, 12, 22, 25, 34, 64, 90}; int n = sizeof(arr) / sizeof(arr[0]); int target = 22; sort(arr, arr + n); // Binary Search int low = 0; int high = n - 1; int index = -1; while (low <= high) { int mid = (low + high) / 2; if (arr[mid] == target) { index = mid; break; } else if (arr[mid] < target) { low = mid + 1; } else if(arr[mid] > target) { high = mid - 1; } } if (index != -1) { cout << "Element " << target << " found at index " << index; } else { cout << "Element not found."; } return 0; }

------------------------------------------------------------------


Binary Search (Built-in): Efficiently finds a target element in a sorted array using std::binary_search


#include <iostream> #include <algorithm> using namespace std; int main() { int arr[] = {11, 12, 22, 25, 34, 64, 90}; int n = sizeof(arr) / sizeof(arr[0]); int target = 22; sort(arr, arr + n); // Check if the target exists in the sorted array using binary search bool found = binary_search(arr, arr + n, target); if (found) { cout << "Element " << target << " found in the array."; } else { cout << "Element not found in the array."; } return 0; }

------------------------------------------------------------------


Lower Bound (Binary Search): Uses binary search to find the leftmost index of the target element in a sorted array or the first element greater than or equal to the target.


#include <iostream> using namespace std; int main() { // 0 1 2 3 4 5 6 7 8 int arr[] = {11, 12, 22, 25, 34, 34, 34, 64, 90}; int n = sizeof(arr) / sizeof(arr[0]); int target = 34; // Sort the array sort(arr, arr + n); int low = 0, high = n - 1; int index = -1; while (low <= high) { int mid = (low + high) / 2; if (arr[mid] >= target) { index = mid; high = mid - 1; } else { low = mid + 1; } } if (index == -1) { cout << "-1\n"; } else { cout << "Lower bound of " << target << " is at index: " << index << endl; } return 0; }

------------------------------------------------------------------


Lower Bound (Built-in): Utilizes std::lower_bound to find the leftmost index of the target element in a sorted array or the first element greater than or equal to the target.


#include <iostream> #include <algorithm> using namespace std; int main() { int arr[] = {11, 12, 22, 25, 34, 34, 34, 64, 90}; int n = sizeof(arr) / sizeof(arr[0]); int target = 34; sort(arr, arr + n); // Find the lower bound of the target element int index = lower_bound(arr, arr + n, target) - arr; if (index == n) { cout << "-1\n"; } else { cout << "Lower bound of " << target << " is at index: " << index << endl; } return 0; }

------------------------------------------------------------------


Upper Bound (Binary Search): Uses binary search to find the leftmost index of the target element in a sorted array or the first element greater than to the target.


#include <iostream> #include <algorithm> using namespace std; int main() { int arr[] = {11, 12, 22, 25, 34, 34, 34, 64, 90}; int n = sizeof(arr) / sizeof(arr[0]); int target = 34; // Sort the array sort(arr, arr + n); int low = 0, high = n - 1; int index = -1; while (low <= high) { int mid = (low + high) / 2; if (arr[mid] > target) { index = mid; high = mid - 1; } else { low = mid + 1; } } if (index == -1) { cout << "-1\n"; } else { cout << "Upper bound of " << target << " is at index: " << index << endl; } return 0; }

------------------------------------------------------------------


Upper Bound (Built-in): Utilizes std::upper_bound to find the leftmost index of the target element in a sorted array or the first element greater to the target.


#include <iostream> #include <algorithm> using namespace std; int main() { int arr[] = {11, 12, 22, 25, 34, 34, 34, 64, 90}; int n = sizeof(arr) / sizeof(arr[0]); int target = 34; // Sort the array (Note: Ensure that the array is sorted before using upper_bound) sort(arr, arr + n); // Find the upper bound of the target element int index = upper_bound(arr, arr + n, target) - arr; if (index == n) { cout << "-1\n"; } else { cout << "Upper bound of " << target << " is at index: " << index << endl; } return 0; }

------------------------------------------------------------------


Count Occurrence of Number 5


#include <iostream> using namespace std; int main() { int arr[] = {5, 5, 3, 2, 5, 8, 5}; int n = sizeof(arr) / sizeof(arr[0]); int target = 5; // Count occurrence of number 5 int count = 0; for (int i = 0; i < n; i++) { if (arr[i] == target) { count++; } } cout << "Number of occurrences of " << target << ": " << count; return 0; }

------------------------------------------------------------------


Frequency Array: Calculates the occurrences of each element in the array by creating a separate array (frequency array) to store the count of each element. It then prints the frequencies of each element.


#include <iostream> using namespace std; const int MAX_SIZE = 100; int main() { int arr[] = {5, 5, 3, 2, 5, 8, 5}; int n = sizeof(arr) / sizeof(arr[0]); // Frequency Array int freq[MAX_SIZE] = {0}; for (int i = 0; i < n; i++) { freq[arr[i]]++; } cout << "Frequency of elements:" << endl; for (int i = 0; i < MAX_SIZE; i++) { if (freq[i] > 0) { cout << i << ": " << freq[i] << endl; } } return 0; }

------------------------------------------------------------------


Summation of Numbers from Index L to R Using Loop:


#include <iostream> using namespace std; int main() { // 0 1 2 3 4 5 6 7 8 9 int arr[] = {1, 2, 3, 4, 5, 6, 7, 8, 9, 10}; int n = sizeof(arr) / sizeof(arr[0]); int l = 2; // Starting index int r = 7; // Ending index // Print the summation of numbers from index l to r using loop int sum = 0; for (int i = l; i <= r; i++) { sum += arr[i]; } cout << "Sum from index " << l << " to " << r << ": " << sum; return 0; }

------------------------------------------------------------------


Prefix Sum: A technique that makes every element in the array equal to the summation of all previous elements.


#include <iostream> using namespace std; int main() { // 0 1 2 3 4 5 6 7 8 9 10 11 int arr[] = {0, 1, 2, 3, 4, 5, 6, 7, 8, 9, 10}; // Array starts from index 1 int n = sizeof(arr) / sizeof(arr[0]); int l = 2; // Starting index int r = 7; // Ending index // Calculate prefix sum for (int i = 2; i <= n; i++) { // Start the loop from index 2 arr[i] += arr[i - 1]; } // The array after prefix sum will be: // 0 1 2 3 4 5 6 [7] 8 9 10 // arr[] = {0, 1, 3, 6, 10, 15, 21, 28, 36, 45, 55} // Print the summation of numbers from index l to r using prefix sum int sum = arr[r] - arr[l - 1]; cout << "Sum from index " << l << " to " << r << ": " << sum; return 0; }

Full text and comments »

  • Vote: I like it
  • +12
  • Vote: I do not like it

By TryOmar, history, 2 years ago, In English

& operator function differently in the context of variable assignment and memory address

int y = 30; 
int &x = y;  // What is x?
cout << (&x); // What are we printing?

In the above example, the & operator is used for two distinct purposes and is important to note that the usage of & in int &x = y; is not the same as in cout << (&x); What is the difference between the two usage and how they work internally?

The & operator in C++ has two main uses: as an alias (reference) and as a memory address.

First, let's explain the following code:

int main(){
    int y = 30; // Declare and initialize a variable y with the value 30
    int &x = y; // Declare a reference variable x that references y
    cout << (&x); // Print the memory address of x (which is the same as the memory address of y)
}

Here, int &x = y declares a reference variable x that refers to the existing variable y. This means that x and y are aliases for the same memory location, so any changes made to x are also made to y and vice versa. However, cout << (&x); is printing the memory address of x (and thus y), not the value of x or y (which is 30).

Let's look at another example of using & as an alias:

void increment(int& x) {
    x++;
}

int main() {
    int y = 5;
    int& r = y; // Declare a reference r that references y
    increment(r);
    cout << y << endl;  // y will now be 6
}

In this example, the increment function takes a reference x as an argument, which is an alias to the variable passed in. The main function passes the variable y directly to the function, which increments the value of y by using x.

Finally, consider the following example of using & for returning an alias from a function:

int& getNumber() {
    int x = 5;
    return x;
}

int main() {
    int& r = getNumber();
    cout << r << endl;   // This will lead to undefined behavior, as the reference r will be a dangling reference
}

This function creates a new integer variable on the stack and assigns it the value 5. However, since the variable x is local to the function, it will be deallocated after the function returns, so the reference r will be a dangling reference, accessing its value will lead to undefined behavior.

To make the function return an actual reference, we can move x from being a local variable to a global variable:

int x = 5;
int& getNumber() {
    return x;
}

int main() {
    int& r = getNumber();
    cout << r << endl;   // This will print 5, as r is now a valid reference to the global variable x
}

My use-case while solving a problem

I made a practical application for the reference function, it can be helpful (I'm no sure if someone knew this before, write me in the comment)

#include <iostream>
using namespace std;

int frq[10]; // example array

int &fr(int x) {
    return frq[x-1];
}

int main() {
    fr(5) = 10; // equivalent to frq[5-1] = 10;
    cout << fr(5) << endl; // prints 10
    fr(5)++; // equivalent to frq[5-1]++;
    cout << fr(5) << endl; // prints 11

    return 0;
}

In programming, it's often useful to have shorthand notation for commonly-used operations. The function int &fr(int x) allows for just that when working with an array called frq.

This function returns a reference to the frq[x-1] element in the frq array. This means that instead of using the syntax frq[x-1] to access and modify elements in the array, you can use the shorthand fr(x).

For example, instead of writing frq[x-1]++ to increment the frequency of the element x, you can write fr(x)++.

So this function helps make your code more concise and readable, and shorter.

Summary: It's worth mentioning that returning reference from a function is a bit risky as it may lead to many unintended behaviors if not handled carefully, but I believe you can do fun things with it.

Full text and comments »

  • Vote: I like it
  • +33
  • Vote: I do not like it

By TryOmar, history, 2 years ago, In English

Well, instead of using built-in functions in the language it's better if you know how they work and use them in your own way manually

I wondered how the ceil and floor function works, especially in the division $$$\frac{a}{b}$$$.

One of my friends advised me to use this formula to find the ceil(a, b) $$$\lceil \frac{a}{b} \rceil = \frac{a + b - 1}{b}$$$ so in code : int ceil = (a + b - 1) / b; this works perfectly fine with positive $$$a/b$$$

But unfortunately, this formula is not accurate, as it does not work with negative numbers

Here is a counter example $$$\lceil \frac{-6}{2} \rceil = -3$$$ but with this formula we get different result $$$\frac {-6+2-1}{2}$$$ = $$$\frac {-5}{2} = -2.5$$$, so we can't rely on this with negative numbers

Now let's focus on floor for a bit, you maybe think floor(a,b) is so simple as int floor = (int)(a/b);

And I believed it and was happy because it is so simple. But the misunderstanding happened because I used to think that division of integers $$$\frac{a}{b}$$$ in programming is equal to rounding down the result $$$\lfloor \frac{a}{b} \rfloor$$$

While the right was Truncating division Truncating division is division where a fractional result is converted to an integer by rounding towards zero.

Or in another way integer division is just omitting the fraction part not flooring the value so we can't say that floor $$$\lfloor x \rfloor$$$ is equal to $$$(int)(x)$$$ because for example $$$\lfloor -2.5 \rfloor \neq (int)(-2.5)$$$

Anyway.. I tried to make that function again by myself without using the datatype double

int myfloor(int a, int b) {
    if (a % b == 0) return (a / b);
    bool negative = (a < 0) ^ (b < 0);
    return a / b - negative;
}

int myceil(int a, int b) {
    if (a % b == 0) return (a / b);
    bool positive = !((a < 0) ^ (b < 0));
    return a / b + positive;
}

If there are any better or shorter ways, please write them in the comments. This is the reason for my post (Seeking better solutions)

Full text and comments »

  • Vote: I like it
  • -24
  • Vote: I do not like it

By TryOmar, history, 2 years ago, In English

Actually, I'm writing this because it took me about 34 minutes to solve this problem 495A - Digital Counter And after I solved it, I saw that everyone's solutions are much shorter than mine

Well the problem hint is to count how many other digits can be constructed by adding some sticks to the x Digit For example, if X=3, So you can construct 3 (Adding 0 Sticks)

8 (Adding 2 Sticks)

9 (Adding 3 Sticks)

So for x=3, you can construct 3 other digits (3,8,9)

Well you count for all other digits (from 0, 1, 2.... to 9) in the same way

Well I saw people counted the values and filled them in an array like so

#include<bits/stdc++.h>
using namespace std;
int main() {
	ll n, d[10] = { 2, 7, 2, 3, 3, 4, 2, 5, 1, 2 };
	cin >> n;
	cout << d[n / 10] * d[n % 10];
}

But in fact, I prefer to count them using the code (Bruteforce) because I do not trust myself (Maybe while I am counting them with my eyes or trying to imagine them. I may miss something)

So Here is What I did, I wrote a program to count them for me, and fill the results in a map or an array

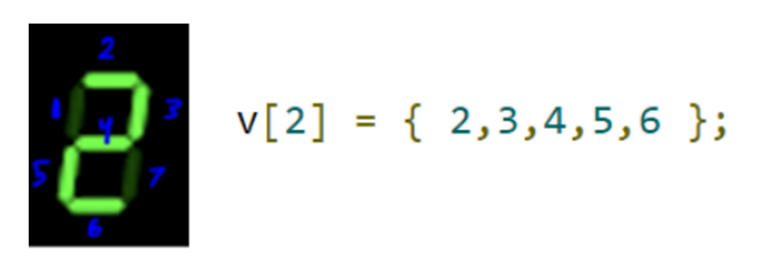
First I numbered each stick and thend saved the indexes in a vector so (Not a hard task)

v[Digit] = {Sticks' indices}

And I did the same thing for the rest of the digits


bool vecInVec(vector<int>v1, vector<int>v2) { for (auto i : v1) if (find(begin(v2), end(v2), i) == end(v2)) return 0; return 1; } map<int, int>cal() { vector<vector<int>>v(10); v[0] = { 1,2,3,5,6,7 }; v[1] = { 3,7 }; v[2] = { 2,3,4,5,6 }; v[3] = { 2,3,4,6,7 }; v[4] = { 1,3,4,7 }; v[5] = { 1,2,4,6,7 }; v[6] = { 1,2,4,5,6,7 }; v[7] = { 2,3,7 }; v[8] = { 1,2,3,4,5,6,7 }; v[9] = { 1,2,3,4,6,7 }; map<int, int>mp; for (int i = 0; i < 10; i++) { for (auto all : v) { if (vecInVec(v[i],all))mp[i]++; } } return mp; }

Well to count how many digits can be constructed by adding sticks, you search for digits has the same sticks, so in coding, I counted the number of vectors have the same indexes

In fact, that code showed me the results accurately.. and I did not need much time to review it.. The only time it took was to count the stick's indices.. and this is much easier than counting the digits that can be built from other digits

0 : 2
1 : 7
2 : 2
3 : 3
4 : 3
5 : 4
6 : 2
7 : 5
8 : 1
9 : 2

Here is the submission link in case you want to see it 177933751

Well to in summary.. This is a longer code, but it is more useful.. Today you learned a way to make the computer think and count with you instead of manual counting (which may be inaccurate).. This is an opinion I will be glad to know your opinions, whether you agree or disagree. Leave me a comment

Full text and comments »

  • Vote: I like it
  • -48
  • Vote: I do not like it

By TryOmar, history, 2 years ago, In English

Well, the simple answer is yes. Let me simplify it for you at first.. How can you print from 1 to n without using a loop?

By repeating this line 1000 times, Your program works just as efficiently as if you made an iterative loop from 1 to 1000.

 cout << x++ << endl;
  if(x==n)return 0;

For example, this code can print you numbers from 1 to 10.. You can develop it up to 1000

    int n,x=1;
    cin >> n; n++;
    cout << x++ << endl; // 1
    if(x==n)return 0;
    cout << x++ << endl; // 2
    if(x==n)return 0;
    cout << x++ << endl; // 3
    if(x==n)return 0;
    cout << x++ << endl; // 4
    if(x==n)return 0;
    cout << x++ << endl; // 5
    if(x==n)return 0;
    cout << x++ << endl; // 6
    if(x==n)return 0;
    cout << x++ << endl; // 7
    if(x==n)return 0;
    cout << x++ << endl; // 8
    if(x==n)return 0;
    cout << x++ << endl; // 9
    if(x==n)return 0;
    cout << x++ << endl; // 10
    if(x==n)return 0;

Input : 6 Output : 1 2 3 4 5 6

Well here comes the big question.. How do we print an array in reverse without using a loop? Well simply by reading the variables in ascending order and printing them in descending

Here is a small example on 5 variables:


int n; cin >> n; //Number of Elements (Size of the array) int x1; cin >> x1; if (n == 1) goto line1; int x2; cin >> x2; if (n == 2) goto line2; int x3; cin >> x3; if (n == 3) goto line3; int x4; cin >> x4; if (n == 4) goto line4; int x5; cin >> x5; if (n == 5) goto line5; line5: cout << x5 << ' '; line4: cout << x4 << ' '; line3: cout << x3 << ' '; line2: cout << x2 << ' '; line1: cout << x1 << ' ';

Input: 1 4 6 10 17 Output: 17 10 6 4 1

You can do the same thing up to 1000 elements or more..believe it or not, I solved some problems related to Arrays/Loops in this way.. And It Worked (Accepted✅)

Full text and comments »

  • Vote: I like it
  • -64
  • Vote: I do not like it

By TryOmar, history, 3 years ago, In English

Hello guys.. I was solving a simple problem that asked me to find the sum of n numbers So I thought about solving this problem with recursion And since I don't like making a lot of functions, instead I decided to use the main function. And yeah that program worked in an efficient way ✅ If you want to try it here it is (just don't use freopen)

#include <bits/stdc++.h>

using namespace std;
int n = 0, x;
int main() {
	//Made By Benjamin007
	static long long sum = 0;
	static int i = 0;
	if (n == 0)
		cin >> n;
	i++;
	if (i <= n) {
		cin >> x;
		sum += x;
		if (i == n)cout << sum;
		return main();
	}
	return 0;
}

Full text and comments »

  • Vote: I like it
  • +19
  • Vote: I do not like it