Блог пользователя sh19910711

Автор sh19910711, 10 лет назад, По-английски

Hi there. Today, I wrote codeforces API client library in Ruby. Check it out ;-)

https://github.com/sh19910711/codeforces-api-client


0. Installation

We can install it by typing:

$ gem install codeforces

1. Usage

Example Code

Here is an example code for getting a user's information:

# first, load client library
require "codeforces"

# and then call web api you need
tourist = Codeforces.user("tourist")
puts tourist.rating  # -> 3254
puts tourist.rank    # -> international grandmaster

API Compatibility

The library has interface compatible with Codeforces API:

# get contest list
Codeforces.api.contest.list.each do |contest|
  puts contest.name
end
# same as below:
Codeforces.each_contest {|contest| puts contest.name }

2. Contributing

We can:

  1. Fork it ( https://github.com/sh19910711/codeforces-api-client/fork )
  2. Create your feature branch (git checkout -b my-new-feature)
  3. Commit your changes (git commit -am 'Add some feature')
  4. Push to the branch (git push origin my-new-feature)
  5. Create a new Pull Request

The library's API reference is here. See also here

Thank you,

Полный текст и комментарии »

  • Проголосовать: нравится
  • +42
  • Проголосовать: не нравится

Автор sh19910711, 10 лет назад, По-английски

Greetings :-)

tl;dr

https://github.com/social-snippet/social-snippet

Application Demo


0. Introduction to the Social Snippet

I'm starting a new software project, "The Social Snippet Project", to manage the snippet libraries for the online judges (e.g. watashi's library, marioyc's library and etc...). As its name implies, it's made possible to share and retrieve your snippet libraries around the world through GitHub and other hosting services.

The social snippet project provides several things:

  1. Command-line interface to use and manage the snippet libraries and its dependencies
  2. Registry system to find the snippet libraries
  3. Editor plugins to use the snippets actually (e.g. Vim, Emacs and etc...)

The mission of the project is to create the snippet system which you can use on any programming languages, any editor softwares and any operating systems.


1. How It Works

Inserting Snippet

Let's assume that we are tackling some graph shortest path problems, and then we decide to solve the problems by using find_shortest() function from our graph library. Here is a pseudo C++ program code for that:

    // solution.cpp
    #include <iostream>
    using namespace std;

    // @snip <graph-lib:algorithm/find_shortest.cpp>

    void solve(Graph graph, Vertex start, Vertex goal) {
        cout << "The Answer = " << find_shortest(graph, start, goal) << endl;
    }

The @snip / @snippet annotation tags

The social snippet specifies the snippet code by putting annotation tags on the comment line.

// @snip <graph-lib:algorithm/find_shortest.cpp>

In order to insert a snippet, we can use a @snip annotation tag. After inserting a snippet, the tagged line will be replaced by a snippet code such as follow:

    // @snippet <graph-lib:algorithm/find_shortest.cpp>
    int find_shortest(Graph graph, Vertex start, Vertex goal) {
        ... some implementation ...
    }

The @snippet annotation tag shows that the snippet code is already inserted in the program code. Finally, the first program code will be translated as the follows:

    // solution.cpp
    #include <iostream>
    using namespace std;

    // @snippet <graph-lib:algorithm/find_shortest.cpp>
    int find_shortest(Graph graph, Vertex start, Vertex goal) {
        ... some implementation ...
    }

    void solve(Graph graph, Vertex start, Vertex goal) {
        cout << "Answer  is " << find_shortest(graph, start, goal) << endl;
    }

Dependency Management

One more thing, the social snippet can resolve the dependencies among the snippets. For example, not deeply thinking, if the previous snippet depends on the dijkstra's algorithm, then a replaced snippet code will be:

    // @snippet <graph-lib:algorithm/find-min/dijkstra.cpp>
    vector<int> find_min(Graph graph, Vertex start) {
        vector<int> min_dist;
        ... some implementation ...
        return min_dist;
    }

    // @snippet <graph-lib:algorithm/find_shortest.cpp>
    int find_shortest(Graph graph, Vertex start, Vertex goal) {
        vector<int> dist = find_min(graph, start);
        return dist[goal.id];
    }

like above. The depended snippets are also inserted into the program code automatically.

Usage Example

Here is my last submission for Codeforces Round #268. I was using the social-snippet as a template code manager.

http://codeforces.me/contest/501/submission/9413315


Installation Guide

Core utilities (including command-line interfaces) are available on RubyGems.org. First, you need to install Ruby, and then type:

    $ gem install social_snippet

And next, you need to install your editor's plugin for the social snippet. In the case of social_snippet.vim (Vim plugin), you should install plugins first as follow:

    git clone https://github.com/Shougo/neobundle.vim ~/.vim/bundle/neobundle.vim

And then, write the followings to your configuration file (~/.vimrc):

    set runtimepath+=~/.vim/bundle/neobundle.vim/
    call neobundle#begin(expand('~/.vim/bundle/'))
    NeoBundle "Shougo/neocomplete.vim"
    NeoBundle "social-snippet/vim-social-snippet"
    NeoBundleCheck
    call neobundle#end()
    let g:neocomplete#enable_at_startup = 1
    let g:social_snippet#complete#enable = 1


The Command-line Interface

The sspm command is to manage the snippet libraries. It has several sub-commands. If you are finding some libraries, then you should type the below command to search:

    $ sspm search <keyword>

And if you find the expected library, then you should type the below command to install:

    $ sspm install <name>

You can view the available sub-commands by typing:

    $ sspm

or

    $ sspm --help

You can also view the usage of the sub-command by typing:

    $ sspm {sub-command} --help

2. Publish Your Libraries on the Registry System

The social snippet reigistry system is currently supported only the libraries publishing on the GitHub. If you have a GitHub repository, you can publish it by putting snippet.json file into the repository. The snippet.json's format is as follow:

    {
        "name": "your-lib-name",
        "desc": "the description",
        "languages": ["C", "C++"],
        "license": "MIT",
        "main": "path/to/src"
    }

The repository will be registered to the registry system as the name written in the snippet.json. In order to publish the repository, you should type the below command:

    $ sspm publish {The URL of repository}

For example:

    $ sspm publish git://github.com/social-snippet/example-repo

Here are the examples, please check them out:


3. Welcome Patches

Why don't you contribute this project. The project is under the terms of MIT License, and the project is still in the development phase. So welcome patches and pull-requests (Now I'm writing the documents for the developers). Feel free to contribute to the project, it's fine if you do just the ones you understand. There is a heavy context switching in the development. My hope is to focus me to a single task as possible. Help me:


Thanks

Полный текст и комментарии »

  • Проголосовать: нравится
  • +26
  • Проголосовать: не нравится

Автор sh19910711, 11 лет назад, По-английски

Hello codeforces,

Today, I have released git-contest which is the Git Extension for online judges. It is the tool to manage your online judge solutions on git repository.

In solving online judge problems, using git hosting service (GitHub, BitBucket or etc...), at times you will be able to manage solutions easily, at other times you will be able to share your solutions usefully, and I think it is good to practice git operating.

demo

demo


What is git-contest

Mainly, git-contest has two features:

  1. Submit a solution to online judge, and create a commit with a submission status automatically.
  2. Manage git branch.

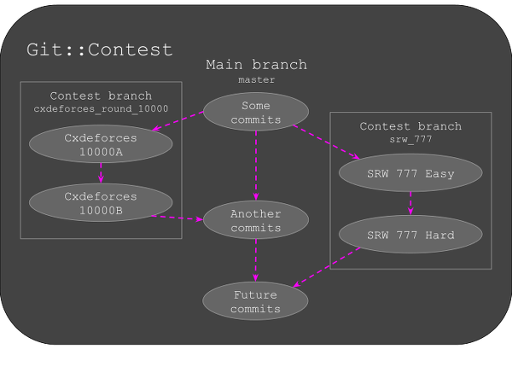
Its branching model is below:

git-contest branching model

Currently, git-contest supports the following online judges:


Why use git-contest

I have managed my online judge solutions using git and GitHub. For example:

However I think it takes a few steps by hand, it is annoying, so I decided to create a git extension to do that effectively. The concept of git-contest is inspired by nvie/gitflow and this article.


How to install git-contest

It needs ruby (>= 1.9.2) and git (>= 1.7). After install them:

$ gem install git-contest

This is all you have to do.

How to configuration git-contest

If you submit a solution to codeforces, you have to set login information. It is written like the followings:

~/.git-contest/config.yml

sites:
    codeforces:
        driver:     codeforces
        user:       {your_codeforces_id}
        password:   {your_codeforces_password}

How to use git-contest

Examples showing the use are the followings:

$ git contest init
-> initialize current directory as git repository for git-contest

$ git contest start foo_contest
-> start contest-branch

$ write solution...

$ git contest submit foo_online_judge -p 12345
-> submit your solution to online judge
-> create a commit with the submission status

$ git contest finish foo_contest
-> finish contest-branch, and it is merged main-branch

Open source project

git-contest is open source project. So its source code has been published on GitHub. The link is the following:

Pull Requests and patches are welcome. If you thought of a good idea about this project, let me know.


// Thanks :)

Полный текст и комментарии »

  • Проголосовать: нравится
  • +60
  • Проголосовать: не нравится

Автор sh19910711, 12 лет назад, По-английски

Hello coders,

Today, the Codeforces Tools 0.0.6 has been released. This update contains a new feature & bug fixes.


New: Added an option page

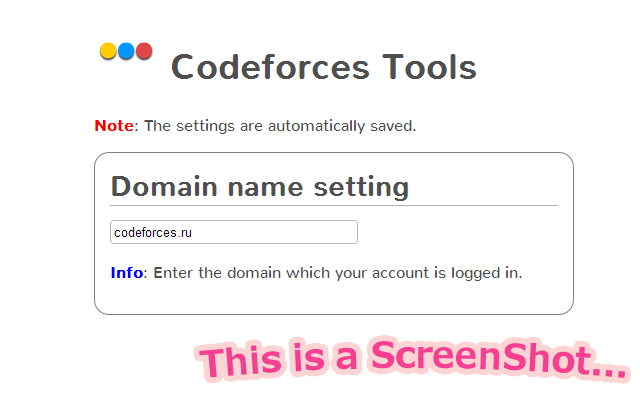
When you see your submissions, if you only logged on to codeforces.ru or the like for Codeforces, you need to set it on the new setting page. It may take a little time, but it's not hard to do. I think this is not enough, so I'll have a time to improve it in order to add the auto detect.


Download & Installation

You can get Codeforces Tools from following links,

And one, you can see the source code on GitHub: https://github.com/sh19910711/codeforces-tools

If you want to know more about the extension, please see also this article: http://www.codeforces.com/blog/entry/5560.


OK, if you had found any bugs or problems, please report it to me :)

Полный текст и комментарии »

  • Проголосовать: нравится
  • +5
  • Проголосовать: не нравится

Автор sh19910711, 12 лет назад, По-английски

Hello,

Today, I've released "Codeforces Tools" extension for the Chrome Web Store. It's the tools improving your Codeforces life, and if you use it, your rating(or skills) might have been improved, but it is not so helpful to solve problems for the real contest as for the practice.


What is it

Mainly, this extension has two special features,

  1. You can check the status of your submissions on problem page.
  2. All sample input/output of the problem page can be copied to clipboard at one time.

*Note: If you want to use first feature, you have to login to your Codeforces Account.


Details & Screenshot

This is main screen, you can check your past submissions on a problem, and go to see the solution.


You can check your solved status on problem page.


All sample input/output of the problem page can be copied to clipboard.


Download & Installation

This extension is a free software, you can get it here => Chrome Web Store

Update: Also, I have published a .crx file on Github, it can be downloaded here => the link of download

Update[2013/02/18]: Version 0.0.6 released. Some bugs have been fixed and add a settings page for codeforces.com, codeforces.ru or etc... Please check it.


// I hope you will enjoy it. :)

Полный текст и комментарии »

  • Проголосовать: нравится
  • +81
  • Проголосовать: не нравится