10x Your CP Workflow: A Smooth Bash Script to Automate Parsing, Testing, Stressing and many more
Hello Codeforces fam,
Over the past few months, I've been building and using a personal tool that completely automates my competitive programming workflow. From parsing problems to checking solutions, stress testing, debugging, and even validating edge cases — this tool has made my life 10x easier and smoother. And now, I’m excited to share it with you so that you can boost your productivity!
What is this tool?
It’s a template-driven Bash script designed to integrate with Competitive Companion and streamline everything — whether you're solving problems on Codeforces, AtCoder, LeetCode, CodeChef, or anywhere else.
With just one command, you can:
- Parse problems
- Compile and run code
- Switch between fast and debug modes
- Stress test using a brute-force checker
- Validate solutions with custom validators
Features Breakdown
1. Fetching: Grab input & output samples from any major coding platform.
2. Running: Instantly checks your solution against sample test cases and clean test feedback in your terminal.
3. Debug Mode:
- Easily toggle between fast and debug compile flags
- Debug flags include:
- Overflow detection
- Address sanitization
- Shows Warnings/errors
- No need to comment out debug prints before submission
4. Stress Testing: It helps you quickly find the test case where your code gives the wrong answer by comparing it with a brute-force solution — great for fixing Wrong answer on test 2 problems.
5. Validator Support:
6. Manual Tests: Add custom test cases manually & run them automatically along with other test cases.
Why Use This?
If you're tired of repetitive setup, manual copying of test cases, comment out dbg(...), or losing time doing stress testing manually, and validate your solution (for constructive) in paper — this script is built for you.
It’s all about automating the boring parts, so you can focus on the problem-solving that actually matters.
How to Get It?
1. Preparing Your System (Linux/Mac/Windows)
By default, Linux and macOS support Bash scripts natively. But Out of the box, Windows does not support it. To run Bash scripts on Windows, we need to enable WSL (Windows Subsystem for Linux), which allows you to run a full Linux environment directly on Windows.
Install WSL (Only for windows users)Step 1: Open PowerShell as Administrator
Step 2: Install WSL
Now type this command into the PowerShell window:
wsl --install
Then press Enter.
This command will:
- Turn on WSL
- Install Ubuntu
Step 3: Restart Your Computer
Step 4: Set Up Your Linux User. When your computer restarts, open Ubuntu terminal (like powershell) . You'll see a message like:
Installing, this may take a few minutes...
Then it will ask:
- Enter a username
- Enter a password
You're done! You can now open your WSL terminal (Ubuntu) and run Bash scripts like on a real Linux system.
Step 5: (optional) Connect to VS Code
Now let's set up your coding environment:
- Create a folder for your projects: mkdir codeforces cd codeforces
- Open the folder in VS Code: code . This will launch Visual Studio Code in your
codeforces folder, making it easy to manage your files and start coding right away!
2. Prerequisites Install
Before you start, make sure you have the following tools installed on your system: g++, gdb, jq (JSON processor),curl (command-line downloader), git
Install on Linux / Windows(WSL)sudo apt update && sudo apt install g++ gdb jq curl git
Install on MacOSbrew install gcc gdb jq curl git
3. Install the Script
Just copy and paste this command into your terminal:
one line copy paste installsudo sh -c "$(curl -fsSL https://raw.githubusercontent.com/sourav739397/Competitive-Programming-Automation/main/install.sh)"
You can find the full source code, documentation, and updates on the project's GitHub page: Competitive-Programming-Automation
Optional: Install Nerd Font for Cool Icons
For an enhanced terminal experience with beautiful icons, you can install a Nerd Font. Just download your favorite font from their website and set it as your terminal font. This will make script outputs and prompts look even cooler!
How to Use the Script ?
After installing the script, here’s a comprehensive walkthrough to get you started:
1. Run the Script
- Navigate to Your Workspace:
Open a terminal and cd into your coding folder (e.g., cd ~/codeforces). - Start the Script:
cprun --help Running cprun --help displays a detailed help menu. This menu lists all available commands, flags, and usage examples for the script.
2. Parse a Problem
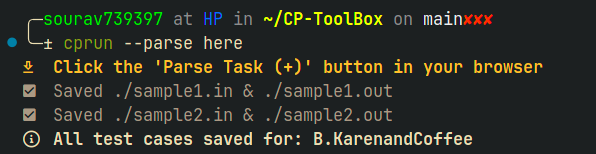
To parse input test cases using the Competitive Companion extension, use the --parse option:
Open your terminal and run: cprun --parse [here/group]
- No argument (default):
Saves samples in a folder named after the problem.
here:
Saves samples in the current directory.
group:
Saves samples into contest/problem folders.
This lets you organize your test cases exactly how you prefer (exactly where you write solution).
- Then, in your browser, go to the problem page and click the Competitive Companion extension icon. The script will automatically fetch and save the test cases.
3. Compile and Test
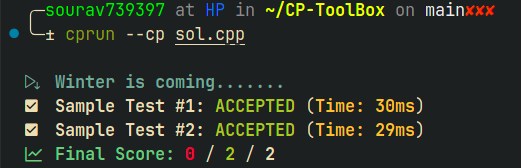
To quickly check your solution against the sample test cases, use the --cp flag:
Formet : cprun --cp your_solution.cpp
4. Toggle Debug/Fast Mode
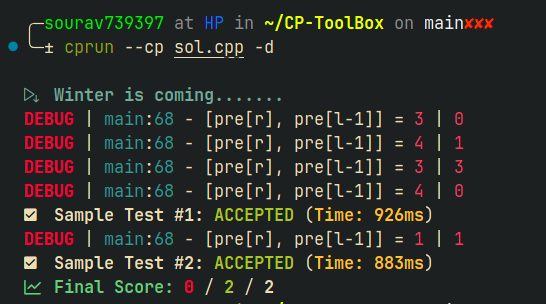
To switch between Debug and Fast modes, use the -d flag when running the script:
Formet : cprun --cp -d your_solution.cpp
Debug Mode (-d):
Compiles your code with debug flags (e.g., -DLOCAL -fsanitize=address -fsanitize=undefined -fsanitize=signed-integer-overflow -D_GLIBCXX_DEBUG).
This helps catch bugs, undefined behavior, and makes debugging easier.
Fast Mode (default):
Compiles with optimization flags (e.g., -O2) for speed, suitable for final testing and submission.
#ifdef LOCAL
#include "debug.h"
#else
#define dbg(...)
#endif
When running in Debug Mode, LOCAL is defined, so dbg(...) works as expected. In Fast Mode (for submission), dbg(...) expands to nothing, so your debug prints are ignored—no need to edit your code!
5. Stress Testing
Stress testing helps you catch tricky bugs by comparing your solution against a brute-force or validator approach (to stress test constructive problem) on many generated test cases.
Usagecprun --stress <your_solution.cpp> <brute_force.cpp/validator.cpp -m> <generator.cpp>
<your_solution.cpp>: Your main solution.<brute_force.cpp>: A slow but correct solution for unique-answer problems.<validator.cpp> -m: A custom validator for problems with multiple valid outputs.<generator.cpp>: Script to generate random test cases.<number_of_tests>: Number of tests to run (default: 100).
Note:
If your solution fails against the brute-force solution during stress testing, the script will prompt you with:
Do you want to add this test case? (Y/N):
By choosing Y, you can save this failing test case for future checks and debugging. This helps you build a collection of tricky cases to strengthen your solution.
Examples:
For unique solutions (using brute force): cprun --stress mysol.cpp brute.cpp gen.cpp 100
For multiple valid outputs (using validator): cprun --stress mysol.cpp validator.cpp -m gen.cpp 100
-m used for multiple solution
6. Add Custom Tests
To manually add your own custom test cases, use the -a flag:
Usage :cprun -a
This command will prompt you to enter the input and the expected output for a new test case. The script will save your custom test alongside the parsed samples, and include it automatically in future test runs.
7. Validate Solutions with a Custom Checker
For problems where multiple valid outputs are possible (like constructive problems), you need a checker to verify correctness instead of simply comparing outputs.
How it works:
Write a checker.cpp that reads:
- Your solution's output
- The expected (reference) output
The checker determines if your output is valid (not necessarily identical to the reference), according to the problem's requirements.
Usage : cprun --cp your_solution.cpp -m
must write checker in checker.cpp and add -m argument.
- The script will:
- Run your solution to produce output.
- Run the checker with your produce output, and the expected output .
- Report whether your solution passes the checker.
When to use:
Use this for problems where there are many correct answers, and you want to ensure your output meets the problem's criteria (e.g., sum to n, valid permutation, etc.), not just matches a sample output.
Tips for an Even Smoother Workflow
While this script works in any terminal and does not require any specific editor or IDE, using Visual Studio Code (VS Code) is highly recommended for the best experience. VS Code offers:
- Built-in terminal support: Run all commands directly inside your editor.
- Custom keyboard shortcuts: Speed up your workflow by mapping frequent actions to keys.
Example VS Code Shortcuts
You can set up these handy shortcuts in VS Code to automate common tasks:
- Alt + F: Fetch problem samples (parse)
- Alt + R: Run your solution
- Alt + D: Run with debug flags (executes under
LOCAL)
To add these shortcuts, copy the keybindings.json from the repo and import it into your VS Code settings.
Note:
This script is universal—you can use it in any terminal, with any editor, on any platform. No editor lock-in!
Conclusion
Thanks for reading! I hope you found this post helpful or at least interesting. If you have any suggestions, spot a mistake, or just want to share your thoughts, feel free to leave a comment below — I'd really appreciate the feedback.
Special thanks to SahilH for helping me write this blog.


